
서론
지난 글에 이어 이번에는 본격적인 인프라 설정 및 자동매매의 기본 플로우를 구현해보고자 한다.
본론
1. 인프라 구축
자동매매 시스템의 전반적인 파이프라인은 다음과 같은 구성요소들로 이루어져 있다.
- Scheduler (Celery Beat) : 주기적으로 작업을 트리거
- Redis : 메시지 브로커
- Collector : 시세(분봉) 데이터를 수집하여 DB에 적재
- Trader : 전략에 따라 매수/매도 시그널을 실행
- Optimizer : 전략 파라미터(가중치 등)를 백테스트하여 최적화
- Database (TimescaleDB) : 시계열 데이터 저장소
전체 컴포넌트들과 그 사이의 데이터 흐름을 도식화해 보면 아래와 같다.
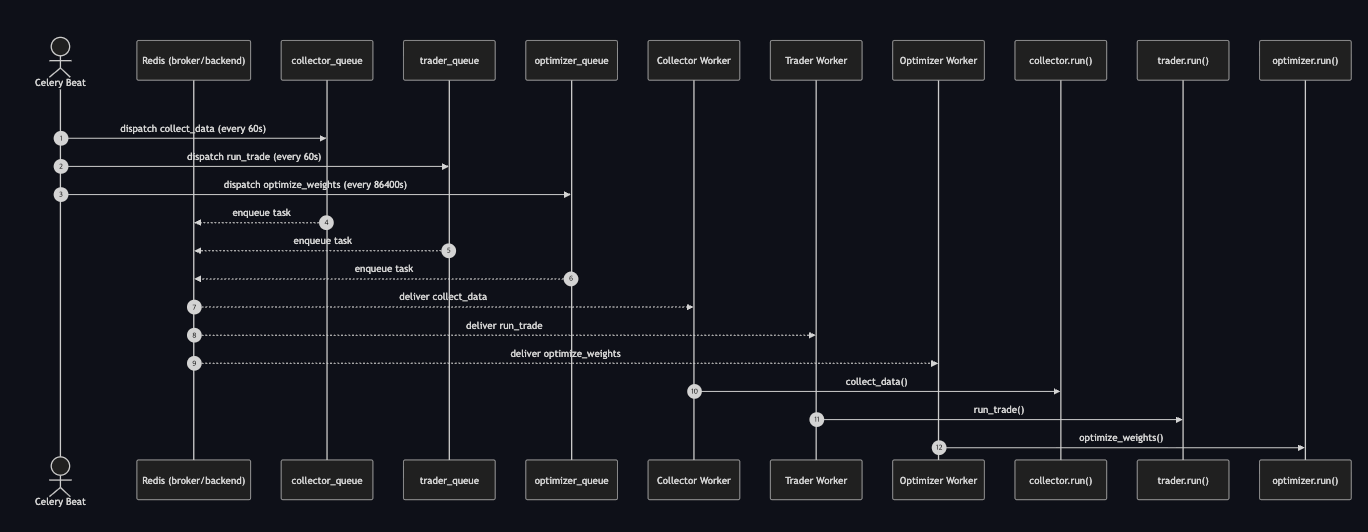
스케쥴러가 주기적으로 작업들을 트리거하고 각 워커들이 작업을 수행하는 매우 간단한 구성이다.
사실 현재 규모상으론 하나의 워커에서 작업들을 모두 수행하여도 지장 없는 수준이다. 그럼에도 불구하고 이와 같이 작업별로 워커를 분리한 이유는 다음과 같다.
- 각 워커가 수행하는 작업의 영향이 다른 워커로 전파되지 않는다.
- 현재는 단일 코인(비트코인)만 거래하지만, 추후 확장할 경우 워커만 늘리면 된다.
- 한 워커가 죽더라도 다른 워커에 영향을 미치진 않는다.
이를 기반으로 하여 아래와 같이 도커 컴포즈 환경을 구성하였다.
도커 컴포즈로 인프라를 구성한 놀라운 이유가 존재하지만 여백이 부족하여 이를 적지 않겠다.
# bin/docker-compose.yaml

networks:
  trading-bot-network:
    driver: bridge

volumes:
  timescale_data: {}

services:
  # -------------------------
  # Database
  # -------------------------
  database:
    build:
      context: .
      dockerfile: ./compose/database/Dockerfile
    env_file:
      - ./.envs/.database
    volumes:
      - timescale_data:/var/lib/postgresql/data
    ports:
      - 5433:5432
    healthcheck:
      test: ["CMD-SHELL", "pg_isready -U \"$$POSTGRES_USER\" -d \"$$POSTGRES_DB\""]
      interval: 10s
      timeout: 5s
      retries: 5
    restart: unless-stopped
    networks:
      - trading-bot-network

  # -------------------------
  # Redis
  # -------------------------
  redis:
    image: redis:7.0
    restart: unless-stopped
    networks:
      - trading-bot-network

  # -------------------------
  # Collector Worker
  # -------------------------
  collector:
    build:
      context: ..
      dockerfile: ./bin/compose/bot/Dockerfile
    env_file:
      - ./.envs/.bot
    command: celery -A bot.tasks worker --loglevel=INFO -Q collector_queue
    depends_on:
      - database
      - redis
    restart: unless-stopped
    networks:
      - trading-bot-network

  # -------------------------
  # Trader Worker
  # -------------------------
  trader:
    build:
      context: ..
      dockerfile: ./bin/compose/bot/Dockerfile
    env_file:
      - ./.envs/.bot
    command: celery -A bot.tasks worker --loglevel=INFO -Q trader_queue
    depends_on:
      - database
      - redis
    restart: unless-stopped
    networks:
      - trading-bot-network

  # -------------------------
  # Optimizer Worker
  # -------------------------
  optimizer:
    build:
      context: ..
      dockerfile: ./bin/compose/bot/Dockerfile
    env_file:
      - ./.envs/.bot
    command: celery -A bot.tasks worker --loglevel=INFO -Q optimizer_queue
    depends_on:
      - database
      - redis
    restart: unless-stopped
    networks:
      - trading-bot-network

  # -------------------------
  # Celery Beat
  # -------------------------
  beat:
    build:
      context: ..
      dockerfile: ./bin/compose/bot/Dockerfile
    env_file:
      - ./.envs/.bot
    command: celery -A bot.scheduler beat --loglevel=INFO
    depends_on:
      - database
      - redis
    restart: unless-stopped
    networks:
      - trading-bot-network
2. 스케쥴러(Scheduler) 구현
스케쥴러는 사실 Cron으로도 구현할 수 있을 정도로 굉장히 간단하다.
그럼에도 불구하고 굳이 Celery Beat를 통해서 구현한 이유는 단순하다.
- 실패한 작업에 대해 자동 재시작이 가능하다.
- 컨테이너가 재시작되어도 레디스에 저장된 작업이 유지되어 장애 상황에 대응이 가능하다.
즉, 코인 자동매매라는 안정성과 신뢰성이 중요한 환경이기에 약간의 오버스펙임에도 Celery Beat를 채택하였다.
이를 코드로 구현하면 아래와 같다.
# bot/tasks.py


from celery import Celery, chain

from .utils import get_env

from . import collector
from . import trader
from . import optimizer

app = Celery(
    "trading_bot",
    broker=get_env("CELERY_BROKER_URL"),
    backend=get_env("CELERY_BACKEND_URL"),
)

app.conf.broker_connection_retry_on_startup = True


@app.task(queue="collector_queue")
def collect_data():
    collector.run()


@app.task(queue="trader_queue")
def run_trade():
    trader.run()


@app.task(queue="optimizer_queue")
def optimize_weights():
    optimizer.run()
# bot/scheduler.py
from celery.schedules import crontab
from .tasks import app
app.conf.beat_schedule = {
"run-collector-every-minute": {
"task": "bot.tasks.collect_data",
"schedule": crontab(minute="*"),
"options": {"queue": "collector_queue"},
},
"run-trader-every-minute": {
"task": "bot.tasks.run_trade",
"schedule": crontab(minute="*"),
"options": {"queue": "trader_queue"},
},
"run-optimizer-every-day": {
"task": "bot.tasks.optimize_weights",
"schedule": crontab(minute="5", hour="0"),
"options": {"queue": "optimizer_queue"},
},
}
app.conf.timezone = "Asia/Seoul"이와 같은 구성을 통해 Celery Beat가 주기적으로 작업을 트리거하여 큐에 넣고, 각 워커가 자신의 큐를 소비하면서 독립적으로 동작하는 구조가 완성된다.
이제 해야 할 일은 각 워커가 실제로 수행할 작업을 구현하는 것이다.
3. 데이터 수집기(Collector) 구현
데이터 수집기(Collector)의 역할은 명확하다.
다만 이 과정에서 중복 데이터가 적재되는 것을 방지하기 위해, DB에 적재된 데이터들 중 가장 최근 타임스태프 이후의 데이터만 적재하도록 로직을 추가하였다.
# bot/collector.py


import time

from datetime import timezone
from dateutil import parser as date_parser
from psycopg2.extras import Json

from .utils import get_env, get_db_connection, get_logger
from .upbit import fetch_recent_candles
from .storage import get_recent_timestamp, insert_candles

logger = get_logger("collector")


def run():
    """수집/적재 실행. 새 데이터 없으면 1초 후 한 번 재시도."""

    try:
        inserted = collect_data()
        if inserted == 0:
            time.sleep(1)
            inserted = collect_data()

        logger.info("collector upserted candles", extra={"inserted": inserted})
    except Exception:
        logger.exception("collector failed")
        raise


def collect_data():
    """마지막 ts 이후 분봉만 upsert하고 삽입/갱신된 행 수 반환."""

    market = get_env("MARKET", "KRW-BTC")
    unit = int(get_env("UNIT", "1"))
    timeframe = f"{unit}m"

    with get_db_connection() as connection:
        raw = fetch_recent_candles(market=market, unit=unit)
        rows = _serialize_candles(raw, timeframe=timeframe)

        last_ts = get_recent_timestamp(connection, timeframe)
        if last_ts is not None:
            rows = [row for row in rows if row[1] > last_ts]

        insert_candles(connection, rows)
        return len(rows)


# ------------------------------
# 내부 헬퍼 메서드
# ------------------------------


def _serialize_candles(raw_candles, timeframe):
    rows = []
    for item in raw_candles:
        ts_utc = date_parser.isoparse(item["candle_date_time_utc"]).replace(
            tzinfo=timezone.utc
        )

        rows.append(
            (
                timeframe,
                ts_utc,
                item["opening_price"],
                item["high_price"],
                item["low_price"],
                item["trade_price"],
                item["candle_acc_trade_volume"],
                item.get("candle_acc_trade_price"),
                Json(
                    {
                        "market": item.get("market"),
                        "timestamp_kst": item.get("candle_date_time_kst"),
                        "unit": item.get("unit"),
                    }
                ),
            )
        )

    rows.sort(key=lambda r: r[1])
    return rows
또한 향후 트레이딩·백테스트 등 다른 모듈과 재사용될 수 있도록 storage.py, upbit.py로 모듈화 하였다.
# bot/storage.py


from datetime import timezone
from psycopg2.extras import Json, execute_values

from .utils import get_db_connection


UPSERT_PAGE_SIZE = 200


# ------------------------------
# Candles
# ------------------------------


def get_recent_prices(timeframe, limit=200):
    sql = """
        SELECT close
        FROM candles
        WHERE timeframe = %s
        ORDER BY ts DESC
        LIMIT %s
    """

    with get_db_connection() as connection, connection.cursor() as cursor:
        cursor.execute(sql, (timeframe, limit))
        rows = cursor.fetchall()

    return [float(r[0]) for r in rows][::-1]


def get_recent_timestamp(connection, timeframe):
    sql = """
        SELECT ts
        FROM candles
        WHERE timeframe = %s
        ORDER BY ts DESC
        LIMIT 1
    """

    with connection.cursor() as cursor:
        cursor.execute(sql, (timeframe,))
        row = cursor.fetchone()
        if not row:
            return None

        ts = row[0]
        if ts.tzinfo is None:
            return ts.replace(tzinfo=timezone.utc)

        return ts.astimezone(timezone.utc)


def insert_candles(connection, rows):
    if not rows:
        return

    sql = """
        INSERT INTO candles (
            timeframe, ts, open, high, low, close, volume, quote_volume, meta
        ) VALUES %s
        ON CONFLICT (timeframe, ts) DO UPDATE SET
            open = EXCLUDED.open,
            high = EXCLUDED.high,
            low = EXCLUDED.low,
            close = EXCLUDED.close,
            volume = EXCLUDED.volume,
            quote_volume = EXCLUDED.quote_volume,
            meta = EXCLUDED.meta
        """

    with connection.cursor() as cursor:
        execute_values(cursor, sql, rows, page_size=UPSERT_PAGE_SIZE)

    connection.commit()
# bot/upbit.py
import uuid
import hashlib
import requests
import jwt
from decimal import Decimal, ROUND_DOWN
from urllib.parse import urlencode
from .utils import get_env
UPBIT_API_BASE = "https://api.upbit.com"
UPBIT_API_HEADER = {
"Accept": "application/json",
"User-Agent": "trading-bot/bot",
"Content-Type": "application/x-www-form-urlencoded",
}
def fetch_recent_candles(market, unit=1, count=200):
"""UPbit API로부터 최근 캔들 데이터 조회"""
url = f"{UPBIT_API_BASE}/v1/candles/minutes/{unit}"
res = requests.get(
url,
params={"market": market, "count": count},
headers=UPBIT_API_HEADER,
timeout=10,
)
res.raise_for_status()
return res.json()상기 흐름을 시퀀스 다이어그램으로 표현하면 다음과 같다.
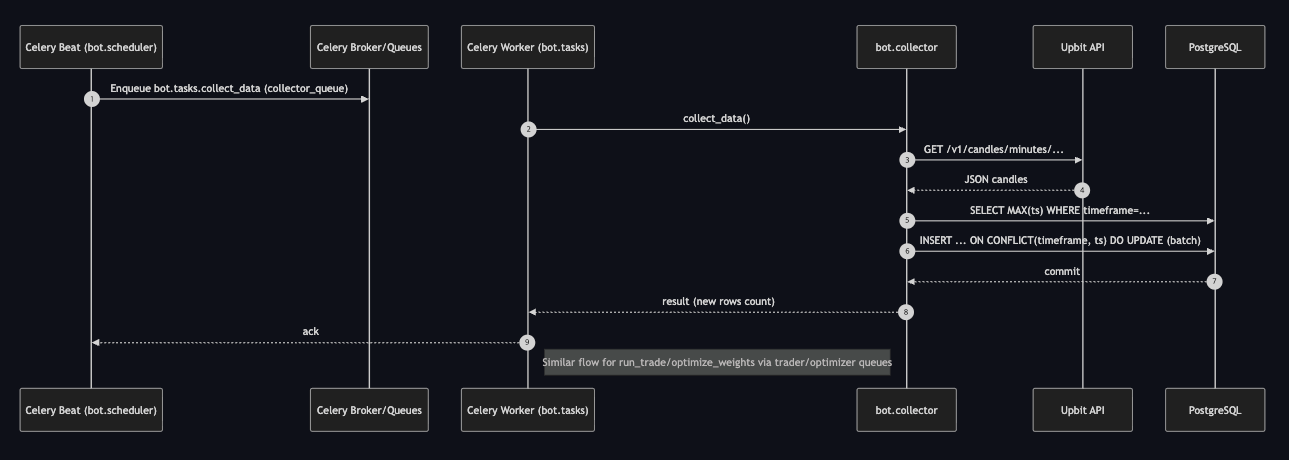
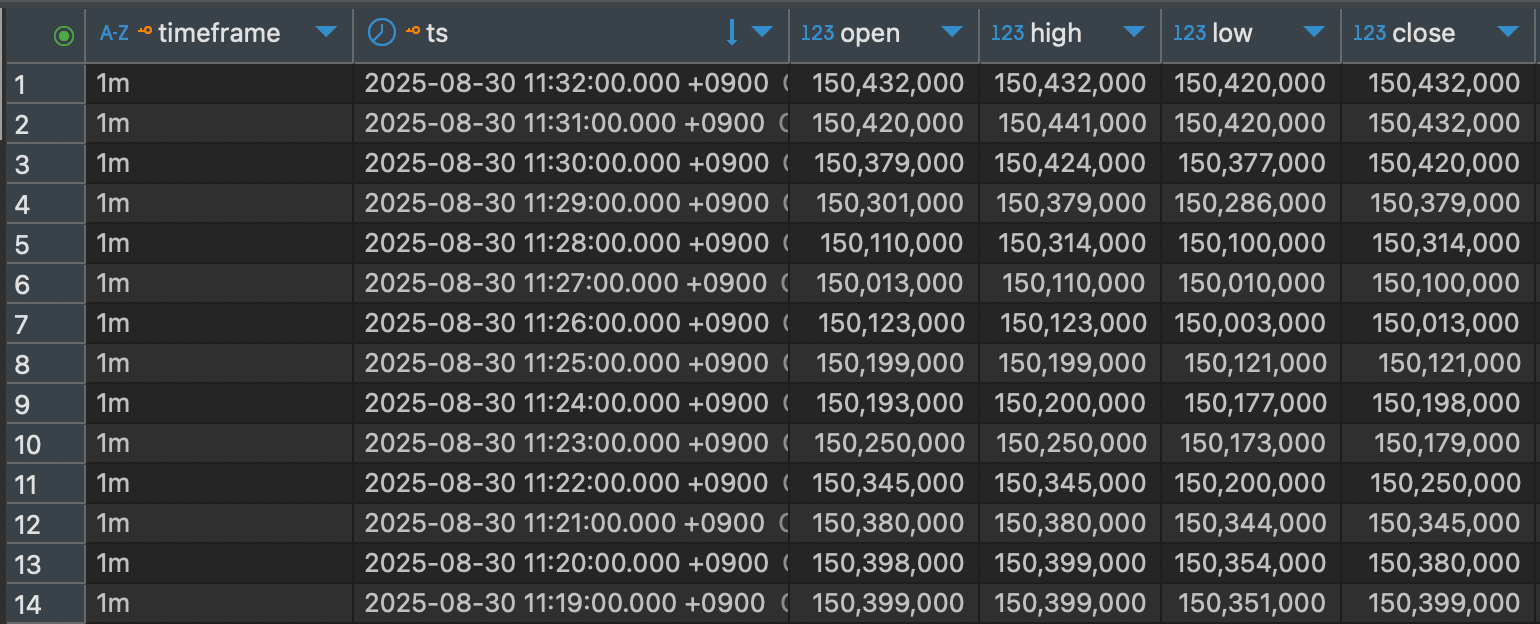
해당 워커를 실행해 보면 아래와 같이 데이터를 조회 및 적재가 정상적으로 수행됨을 확인할 수 있다.

4. 트레이더(Trader) 구현
트레이더 워커는 앞선 수집기와 비교하면 로직이 살짝은 더 복잡하다.
- 매수 : '가용 자산 / 현재 가격'의 개수만큼 코인 매수
- 매도 : '보유 코인 전량' 매도
추가로 '수수료 차감', 슬리피지 방지용 가격 보정(종가 + α)과 같은 부가 로직을 적용하였다.
이 과정에서 슬리피지에 대해 내가 잘못 이해하고 있었다는 사실을 발견할 수 있었다.
처음엔 내부 로직의 지연 때문에 슬리피지가 발생한다고 생각했지만, '주문 제출 후 체결까지 걸리는 시간 차이'가 그 원인이었다.
즉, 단순히 종가에 맞춰 주문을 넣으면 체결이 안될 수 있기에, 이를 보정(AGGRESSIVENESS)하여 매매를 진행하였다.
상기 로직들을 반영한 코드는 아래와 같다.
# bot/trader.py


from datetime import timezone
from dateutil import parser as date_parser
from decimal import Decimal, ROUND_DOWN

from .utils import get_env, get_logger, get_db_connection
from .strategies import ensemble_signal
from .storage import (
    get_recent_prices,
    get_recent_weights,
    insert_order,
    insert_trade,
)
from .upbit import (
    fetch_account_balances,
    fetch_order,
    place_buy_limit,
    place_sell_limit,
    round_price_to_tick,
)

logger = get_logger("trader")


def run():
    try:
        executed = run_trade()
        if executed:
            logger.info("trade executed", extra=executed)
        else:
            logger.info("no trade signal")
    except Exception:
        logger.exception("trader failed")
        raise


def run_trade():
    market = get_env("MARKET", "KRW-BTC")
    threshold = float(get_env("THRESHOLD", "0.2"))
    aggressiveness = float(get_env("AGGRESSIVENESS", "0.0015"))

    prices = get_recent_prices("1m", limit=200)
    if len(prices) < 3:
        return None

    last_price = prices[-1]

    # 전략 기준 매수/매도 여부 판단
    weights = get_recent_weights()

    score = ensemble_signal(prices, weights)
    if score >= threshold:
        return _execute_buy(market, last_price, aggressiveness)
    elif score <= -threshold:
        return _execute_sell(market, last_price, aggressiveness)

    return None


# ------------------------------
# 내부 헬퍼 메서드
# ------------------------------


def _execute_buy(market, last_price, aggressiveness):
    """매수가 계산 및 주문"""

    # 가용 잔고 계산 및 최소 주문 금액 확인
    balances = fetch_account_balances()
    balance = _parse_available_balance(balances, "KRW")
    if balance <= 5000.0:
        return None

    # 목표 매수 가격 계산
    target_price = round_price_to_tick(last_price * (1 + aggressiveness), mode="up")

    # 간단 수량 계산(수수료 반영, 8자리 내림) 및 최소 주문금액 확인
    volume = _calc_buy_volume(balance, target_price)
    if volume <= 0:
        return None
    if target_price * volume <= 5000.0:
        return None

    # 지정가 매수 주문 전송 및 기록
    response = place_buy_limit(market, target_price, volume)
    _record_order_and_trades("buy", target_price, volume, response)

    return {
        "side": "buy",
        "price": target_price,
        "volume": volume,
        "response": response,
    }


def _execute_sell(market, last_price, aggressiveness):
    """매도가 계산 및 주문"""

    # 가용 잔고 계산
    balances = fetch_account_balances()
    balance = _parse_available_balance(balances, market.split("-")[-1])
    if balance <= 0:
        return None

    # 목표 매도 가격 계산
    target_price = round_price_to_tick(last_price * (1 - aggressiveness), mode="down")

    # 최소 주문 금액 충족 검사: 보유 코인 가치가 5,000 이하면 주문 불가
    if balance * target_price <= 5000.0:
        return None

    # 보유 코인 전량 매도 및 기록
    response = place_sell_limit(market, target_price, balance)
    _record_order_and_trades("sell", target_price, balance, response)

    return {
        "side": "sell",
        "price": target_price,
        "volume": balance,
        "response": response,
    }


def _parse_available_balance(balances, currency):
    """해당 통화의 가용잔고 반환"""

    free, locked = 0.0, 0.0
    for b in balances:
        if b.get("currency") == currency:
            free = _to_float(b.get("balance", 0.0), 0.0)
            locked = _to_float(b.get("locked", 0.0), 0.0)

            break

    return max(0.0, free - locked)


def _calc_buy_volume(balance_krw: float, target_price: float) -> float:
    """가용 KRW와 목표가로 매수 수량을 간단히 계산(수수료/버퍼 반영, 소수 8자리 내림)."""

    try:
        fee_rate = float(get_env("FEE_RATE", "0.0005"))
    except Exception:
        fee_rate = 0.0005

    try:
        fee_buffer = float(get_env("FEE_BUFFER", "0.0005"))
    except Exception:
        fee_buffer = 0.0005

    effective_unit_cost = target_price * (1.0 + fee_rate + fee_buffer)
    if effective_unit_cost <= 0:
        return 0.0

    raw_volume = balance_krw / effective_unit_cost
    vol = Decimal(str(raw_volume)).quantize(Decimal("0.00000001"), rounding=ROUND_DOWN)
    return float(vol)


def _record_order_and_trades(side, price, quantity, response):
    order_uuid = response.get("uuid") if isinstance(response, dict) else None
    exchange_meta = response if isinstance(response, dict) else {}

    with get_db_connection() as connection:
        order_id = insert_order(
            connection=connection,
            side=side,
            price=price,
            quantity=quantity,
            status="new",
            exchange_order_id=order_uuid,
            meta=exchange_meta,
        )

        connection.commit()

        if order_uuid:
            detail = fetch_order(order_uuid)

            trades = detail.get("trades", []) or []
            for t in trades:
                data = _serialize_trade(t, order_id)
                insert_trade(connection=connection, **data)

        connection.commit()


def _serialize_trade(raw_trade, order_id):
    data = {
        "order_id": order_id,
        "executed_at": (
            lambda dt: (
                dt.astimezone(timezone.utc)
                if dt.tzinfo
                else dt.replace(tzinfo=timezone.utc)
            )
        )(date_parser.isoparse(raw_trade.get("created_at"))),
        "price": _to_float(raw_trade.get("price")),
        "quantity": _to_float(raw_trade.get("volume")),
        "fee": _to_float(raw_trade.get("fee"), 0.0),
        "fee_asset": raw_trade.get("fee_currency"),
        "slippage": None,
        "meta": raw_trade,
    }

    return data


def _to_float(value, default=0.0):
    try:
        return float(value) if value not in (None, "") else default
    except (TypeError, ValueError):
        return default
# bot/strategies.py
import numpy as np
def ensemble_signal(prices, weights):
signals = {
"trend": _sig_trend(prices),
"momentum": _sig_momentum(prices),
"swing": _sig_swing(prices),
"scalping": _sig_scalping(prices),
"day": _sig_day(prices),
"price_action": _sig_price_action(prices),
}
return sum(weights.get(k, 0) * signals.get(k, 0) for k in weights)
# ------------------------------
# 전략 구현
# ------------------------------
def _sig_trend(prices):
if len(prices) < 2:
return 0
return 1 if prices[-1] > prices[-2] else -1
def _sig_momentum(prices, period=5):
if len(prices) <= period:
return 0
return 1 if prices[-1] - prices[-(period + 1)] > 0 else -1
def _sig_swing(prices, s=5, l=20):
if len(prices) < max(s, l):
return 0
return 1 if float(np.mean(prices[-s:])) > float(np.mean(prices[-l:])) else -1
def _sig_scalping(prices, take_ratio=0.001, stop_ratio=0.001):
if len(prices) < 2:
return 0
prev = float(prices[-2])
last = float(prices[-1])
take_ratio = abs(float(take_ratio))
stop_ratio = abs(float(stop_ratio))
if prev <= 0 or not np.isfinite(prev) or not np.isfinite(last):
return 0
change = (last - prev) / prev
if change >= take_ratio:
return 1
if change <= -stop_ratio:
return -1
return 0
def _sig_day(prices):
if len(prices) < 2:
return 0
return 1 if prices[-1] > prices[-2] else -1
def _sig_price_action(prices):
if len(prices) < 3:
return 0
last = prices[-1]
prev_max = float(np.max(prices[:-1]))
prev_min = float(np.min(prices[:-1]))
if last > prev_max:
return 1
if last < prev_min:
return -1
return 0또한 이전 모듈화했던 upbit 관련 모듈에 자산 조회, 매매를 위한 함수를 추가하였다.
캔들 데이터 조회와 달리 해당 API는 인증키가 필요하다. 관련해선 다른 자료도 많기에 이 글에선 다루지 않겠다.
# bot/upbit.py


def fetch_account_balances():
    """계좌 잔고 조회"""

    url = f"{UPBIT_API_BASE}/v1/accounts"

    headers = {
        **UPBIT_API_HEADER,
        **_make_auth_headers(),
    }

    res = requests.get(url, headers=headers, timeout=10)
    res.raise_for_status()
    return res.json()


def round_price_to_tick(price, mode="down"):
    """호가단위에 맞춰 반올림."""

    p = float(price)

    tick = _get_tick_size(p)
    if mode == "up":
        return float(((int((p + tick - 1e-12) / tick)) * tick))
    if mode == "nearest":
        return float(round(p / tick) * tick)

    return float(int(p / tick) * tick)


def place_buy_limit(market, price, volume):
    """지정가 매수 주문"""

    if price <= 0 or volume <= 0:
        raise ValueError("Price and volume must be greater than 0")

    url = f"{UPBIT_API_BASE}/v1/orders"
    params = {
        "market": market,
        "side": "bid",
        "ord_type": "limit",
        "price": _format_price(price),
        "volume": _format_volume(volume),
    }
    query_string = urlencode(params)
    headers = {
        **UPBIT_API_HEADER,
        **_make_auth_headers(query_string=query_string),
    }

    res = requests.post(url, data=query_string, headers=headers, timeout=10)
    if not res.ok:
        raise RuntimeError(f"Upbit buy order failed: {res.status_code} {res.text}")

    return res.json()


def place_sell_limit(market, price, volume):
    """지정가 매도 주문"""

    if price <= 0 or volume <= 0:
        raise ValueError("Price and volume must be greater than 0")

    url = f"{UPBIT_API_BASE}/v1/orders"
    params = {
        "market": market,
        "side": "ask",
        "ord_type": "limit",
        "price": _format_price(price),
        "volume": _format_volume(volume),
    }
    query_string = urlencode(params)
    headers = {
        **UPBIT_API_HEADER,
        **_make_auth_headers(query_string=query_string),
    }

    res = requests.post(url, data=query_string, headers=headers, timeout=10)
    if not res.ok:
        raise RuntimeError(f"Upbit sell order failed: {res.status_code} {res.text}")

    return res.json()
마찬가지로 상기 흐름을 표현한 시퀀스 다이어그램은 아래 이미지와 같다.
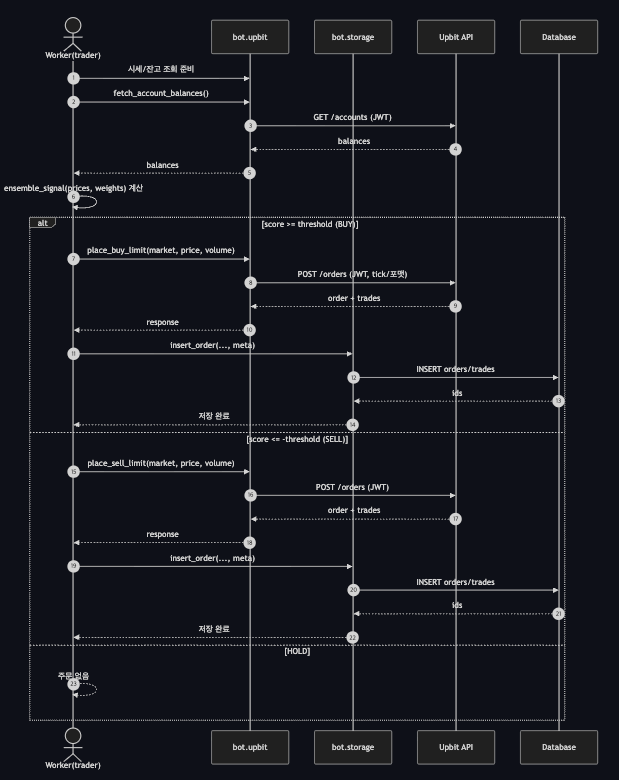
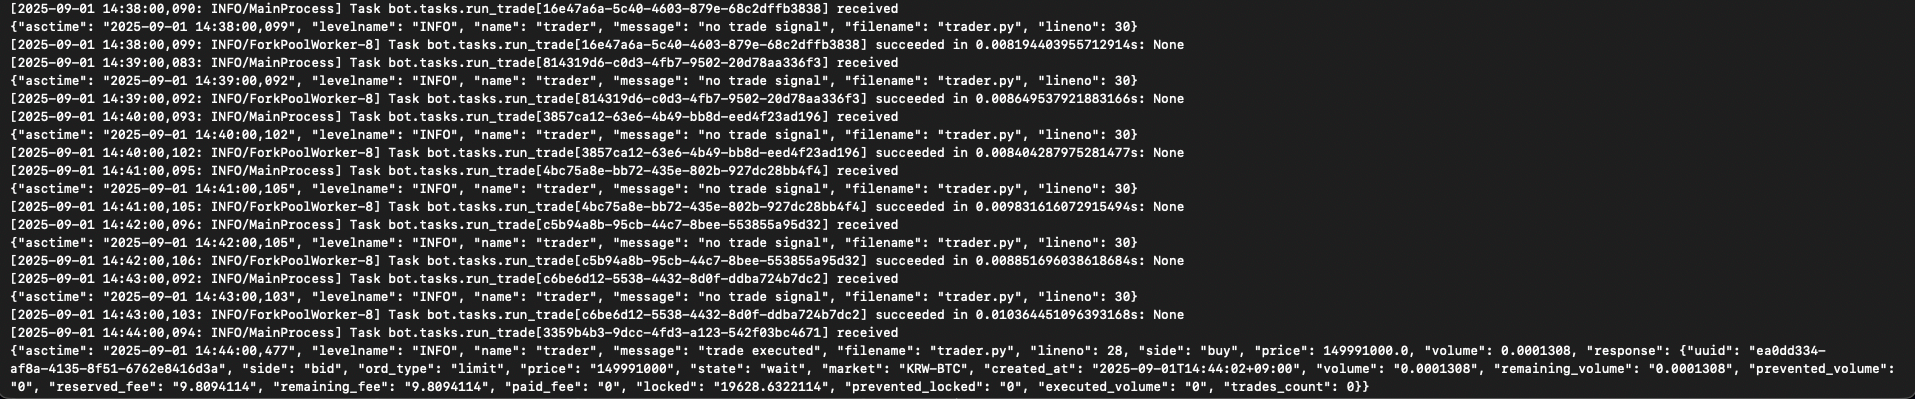
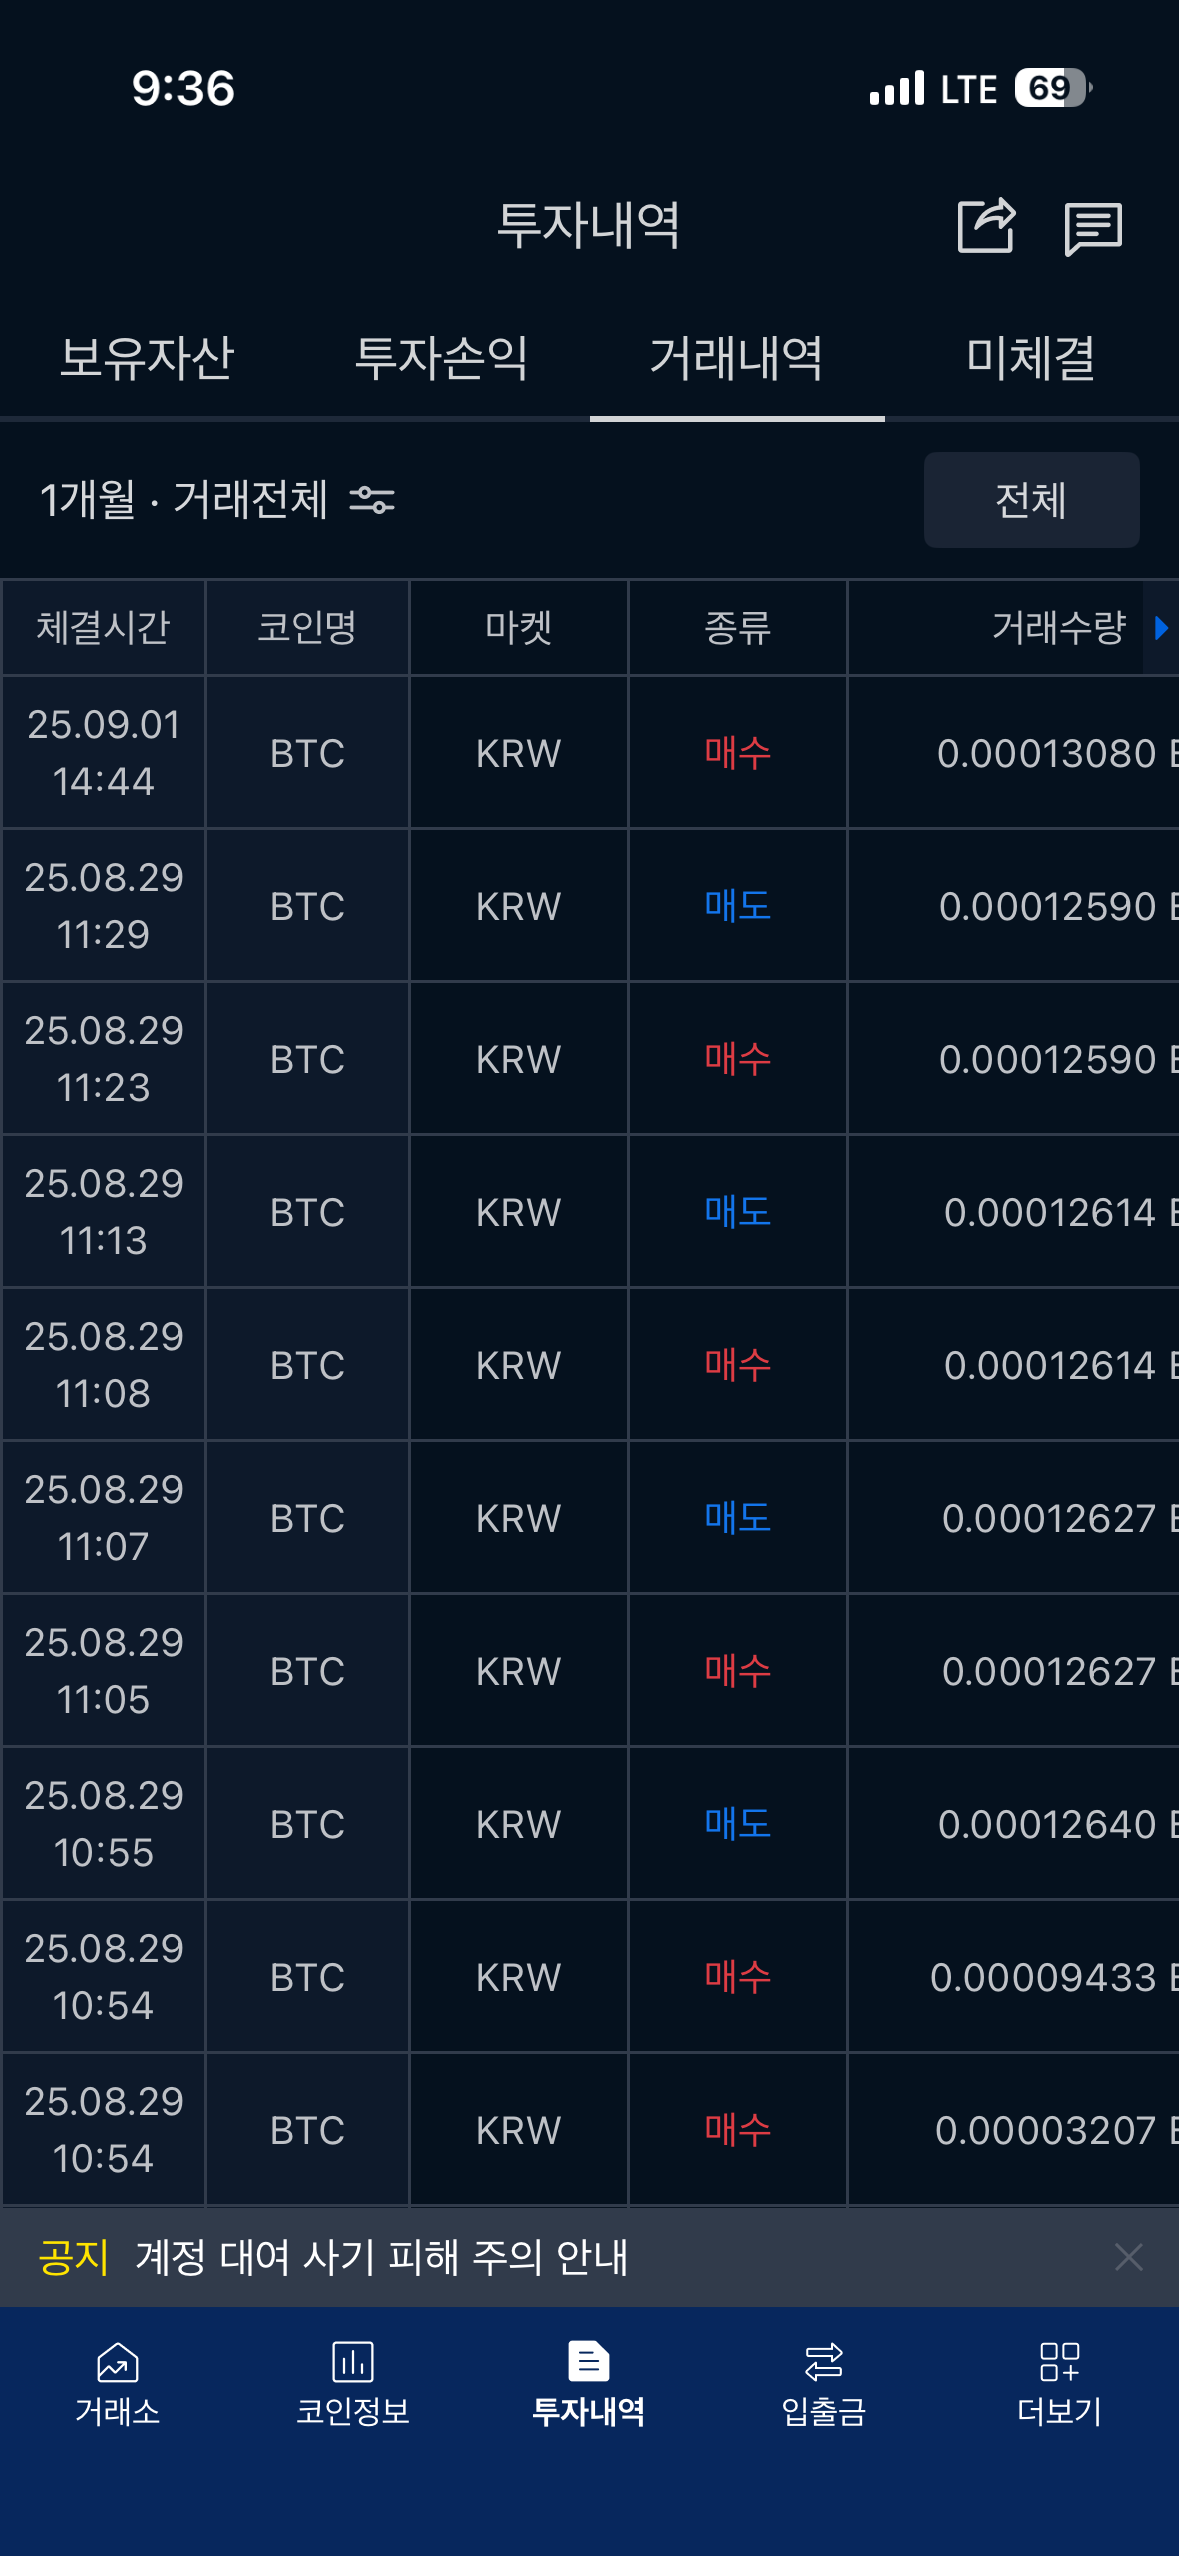
실제 워커 로그를 확인해보면 신호값에 따라 정상적으로 매매를 수행함을 확인할 수 있다.
결론
이번 글에서는 인프라 파이프라인의 기본 틀을 잡고, 데이터 수집기(Collector)와 트레이더(Trader)까지 구현해 실시간 데이터 수집과 매매 수행까지 완성했다. 즉, 일단은 데이터를 수집하고 거래를 수행하는 기본적인 자동매매의 틀은 완성한 것이다.
다음 글에서는 최적화(Optimizer)를 구현해 파라미터를 자동으로 탐색·튜닝하는 과정을 다룰 예정이다.
그전에, 일단 서버가 드디어 도착하였기에 세팅 먼저 하고 난 뒤 이후 개발을 진행할 듯하다.
마지막으로 오늘도 일용할 코드를 내려주신 전지전능하신 ChatGPT님을 찬양하며 이 글을 마치고자 한다.
참고자료
